Back in December 2016, I talked about using oil to clean and store brushes. This post is a follow-up on how it has worked out over the last 3 months and how I have implemented it. I have since done a 1 year follow up to this detailing some pros and cons I’ve experienced over the last year of using walnut oil to clean my brushes. Read all about it in A Year of Oil Painting Without Solvents.
At some point, it I realized that I hate washing brushes and will avoid painting entirely in order not to. I decided that I needed (for my art’s sake) to find a way to wash my brushes less often. I came across a group of artist that rarely washed their brushes and instead coat them in oil to prevent them from drying out between painting sessions. For that I needed a slow drying oil. So I did some research and settled on walnut oil.

Walnut oil has been used in oil painting for ages. I even have some walnut oil paints in my stash. It’s in the family of drying oils that artists use alongside linseed, poppy and safflower. It’s a slow drying oil (faster than safflower and poppy) that doesn’t yellow as much as linseed. Making it more suitable than linseed for light colors and better than safflower and poppy in terms of dry times. It’s a popular oil among artists trying to rid themselves of solvents and M. Graham offers paints ground in walnut oil instead of linseed.

There is debate over using cooking oil vs. artist oil. It is speculated that cooking oil contains preservatives that retard the drying process and is therefore unsuitable for painting. With that uncertainty in mind, I’ve decided to use cooking oil for cleaning and storage only. However, the cooking oil I bought doesn’t have any additives listed on the label. The small amounts of oil left in the brush won’t greatly effect the overall painting since it’s a drying oil and it will dry eventually. I haven’t had any issues so far with my paint not drying to the touch within a reasonable amount of time. If you’re uncomfortable with the idea of using cooking oil, just use artist oil. The choice is entirely yours.

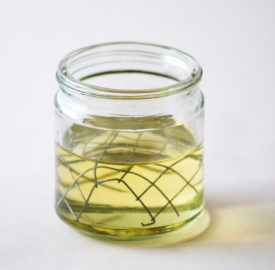
For cleaning, I fitted a square of hardware cloth into a small glass jar and filled the jar with walnut oil to about half an inch above the hardware cloth. To clean the brush, I just brush it against the hardware cloth and wipe it on a clean paper towel, repeating as necessary. Working the brush against the side of the jar is also pretty effective. To “rinse” I dip the brush in clean oil and wipe off. The next step is to either wash with soapy water or store in clean walnut oil.

Cleaning with oil instead of turpentine doesn’t really take any longer and is ideal for use in the winter when proper ventilation is problematic. The pigment settles to the bottom of the jar after a while, but the oil will never be as clean as before. After I really shook up my 3 month jar, I poured it into an empty oil bottle to see how much would settle out. What you see below is after roughly a week of settling. Don’t expect it to separate as well as it would in turpentine.

To store brushes between painting sessions, get out as much pigment as possible and position the brushes, bristles down and submerged up to the ferrule, in clean walnut oil. I found a brush washer at Hobby Lobby. Before painting again, just squeeze out the oil on a paper towel. My paper towel preference is the blue ones for mechanics you find at auto parts stores. They absorb more oil than regular paper towels and are more durable for scrubbing paint off canvas.

This method needs to be monitored. I’ve left brushes in oil for a week several times, but a week is probably the longest I’d feel comfortable leaving it. The oil is drying, albeit slowly, and will damage your brushes if left too long.
My oil, sitting out at room temperature for the last three months, is likely rancid. I certainly wouldn’t eat it, but I think it’s fine for art purposes. Some of my paint tubes are 10 years old, making the oil in them almost certainly rancid. My paints smell the same as my cleaning oil. I describe the smell as dusty or like oil paint (obviously), which definitely smells different from a freshly opened bottle of oil, but not disgusting. This is all highly unscientific, but enough for me to be fine with it.

If you know you won’t be painting for more than a week, wash the brushes using soap and water. My previous homemade holder only held 6 brushes, which helped, but sometimes I used more or different brushes and had to wash the brushes that didn’t fit. Instructions to make the clothes pin holder are here.
The clothes pin holder can accommodate larger brushes so I’ll probably keep it around. The biggest flaw of the brush washer is that it doesn’t come in multiple sizes and the spring can only hold medium to small brushes. Large diameter brushes just pop out and you have to be careful with medium brushes.

My brushes look great! I bought a pack of new cheap brushes at the beginning of my experiment so I could more clearly see any damage. The above picture is of my brushes after 3 months of hard use and almost no washings (some have never been washed). They still look new aside from paint on the handles. The bristles are holding their shape really well and there hasn’t been any paint build up near the ferrule.
I’m crossing my fingers these brushes last more than a year. I’ve needed new brushes every year for the last few years because I wear them out. Last year’s expensive brushes didn’t last any longer than cheapies. Although, worn down brushes have really come in handy for sketching on canvas and soft blending.
To use as a medium, I’d suggest using artist grade walnut oil. Because of various unknowns about cooking oil it’s a safer bet to just use artist grade oil. Although some artists report using cooking oil without issue. I couldn’t find any hard facts on the issue.
Walnut oil can be used as is to extend dry time (a little goes a very long way), sun-thickened like linseed oil to speed its dry time, and M. Graham makes a walnut alkyd that will also speed dry time. There are also several medium recipes* listed over at Wet Canvas that use walnut oil and it can be used for oiling out. I have yet to use it as a medium because I prefer to use up what I have first, but I’ve heard good things about it and intend to give it a try in the future.
*If you’re using mediums with damar varnish as an ingredient, I highly recommend cleaning your brushes with turpentine. Turpentine is the only thing that is going to break down the resin and remove it from your brushes. You’re likely using turpentine anyway in damar mixes.
The best thing about this experiment (aside from no more brush washing) is that I no longer have to use turpentine or its odorless counterparts. After not using turpentine for 3 months, I tried it last week and ran screaming from the room just to get away from it. Joking. I did have to leave the room though.
If you have any experiences using walnut oil to clean, store, or as a medium I’d love to hear.
In case you missed it, read about my experiences with using only walnut oil to clean my brushes for the last year in A Year of Oil Painting Without Solvents.
**These are my very non-scientific findings on using walnut oil for oil painting. There was little in the way of hard facts about walnut oil in the context of art. Speculation, here-say, and anecdotes seemed to be the dominant forms of information. When I researched brush care, my findings ran the gamut from reasonable to absurd. I found something that made sense to me and fit my needs. So far, I haven’t damaged brushes or paintings (as far as I know) in my experiments.


Leave a Reply